Package Management in JavaScript
Learning Objectives
In the last module we started to write reusable blocks of code by defining functions. Using functions helps to keep our code clean and maintainable, and as an added bonus we only need to write the logic out once! We’re not the only developers doing this though - everyone is trying to reuse code wherever they can.
This practice is an established part of a typical workflow and every language has its own tools to support this. In this section we will look at how we can set up one of the JavaScript tools to support our development.
Setting up a package manager.
When we bundle code together and share it we publish it as a package. In order to use someone else’s code in our projects we need to use a package manager to install it. The package manager we will use is called npm.
💡Other package managers
Before we start using npm in a project we need to so some setup. It was already installed for us when we set up Node but we also need to configure the project. Create a new directory called packages-practice and navigate there in your terminal. Once you are there use the command npm init -y to start the setup.
npm init -yYou should see some output printed:
Wrote to username/cyf-work/packages-practice/package.json:

{
  "name": "packages-practice",
  "version": "1.0.0",
  "description": "",
  "main": "index.js",
  "scripts": {
    "test": "echo \"Error: no test specified\" && exit 1"
  },
  "keywords": [],
  "author": "",
  "license": "ISC",
  "type": "commonjs"
}
Look carefully at the first line: it says something was written to a file. If we check using ls we’ll see that there’s now a file called package.json, and if we open the directory in VSCode we see that it includes all the information printed above. Now we have this file we can use npm to do a few different things with our project, but for now we’ll focus on adding packages.
📖Definition: JSON
This file is written in JSON - JavaScript Object Notation. Values before a colon are keys and the values after the colons are the associated values. Using this structure we can quickly find important information about our project.
We will look at JavaScript objects in more detail in the next module.
💡The `-y` flag
-y to the end of the setup command. This was optional, but by including it we prep-populated package.json with some common default values. If you don’t include the flag the command will still work but you will be prompted to add a value for each property before the file is created.Installing a package
We’re going to add our first package. We’re going to use is-odd which provides logic to check if a number is odd or not. This is a very simple example of the workflow, but the process would be the same if we were adding a more complex package.
💡npmjs.com
Switch back to your terminal and make sure you are in the same directory as package.json, then type the command below:
npm install --save is-oddLet’s break down the command:
npmindicates that the command is run using npminstallindicates that we want to install a package- the
--saveflag adds additional instructions about how we save the package. We will see some alternatives later in this sprint. is-oddis the name of the package we want to install
Switch back to VSCode and you will see some new information at the bottom of package.json:
{
  // ...
  "dependencies": {
    "is-odd": "^3.0.1"
  }
}
The is-odd package is now listed in our project as a dependency. This is important information for anyone else who wants to run our project: it tells them that our code depends on something from is-odd and they will need to install it too.
Take a look in the file explorer tab and you will see there is also now a folder called node_modules. If you open it up you will see a directory for our is-odd package which contains the code it needs to run. When we ran npm install this is what was downloaded. There is also a directory for something else called is-number, which is a dependency of is-odd. It’s very common for additional packages to be installed to support the one we need.
Think back to the last sprint where we spoke about .gitignore files. In that section we saw a .gitignore with node_modules already included in it, and now we can start to see why. If we tried to track everything in node_modules with Git we would end up with a very bloated repository and the potential for lots of conflicts. Instead we ignore the folder and ask anyone using our code to download their own copy of the packages.
Using a Package
Learning Objectives
We have added a package to our project, now it’s time to use it.
importing the package
Before we can use the package we need a file to work in. Create a new file called checkingOddNumbers.js in your packages-practice directory.
We also need to make a change to the package.json file. The way we load the package into our code depends on how the project is configured, so we need to update the type property on line 12. Change its value to module as shown below:
{
  // ...
  "type": "module",
  // ...
}
Now we can hook up our package. At the top of checkingOddNumbers.js we need to add an import statement. Any time we need to use code which is defined in a different file we need to import it.
import isOdd from 'is-odd';Generally we will specify which functions we want to import (isOdd in this case) to avoid bloating our program too much. When importing from a package we only need to provide the name of the package in quotes, when importing from another file in our project we need to give its relative path.
Using the package
Once we have imported the code we can use it just like any other function we defined ourselves. Try it by calling it a couple of times and printing the values.
import isOdd from 'is-odd';

console.log(isOdd(1));
// true

console.log(isOdd(2));
// false
In the rest of this sprint we will be following a similar workflow: add a package using npm; import it into our files; use the functions it provides.
✍️Exercise: Using a package
Try to recreate the workflow for yourself.
- Create a new directory called
translating-five - Initialise an npm project there - you can use the default values
- Install the five package. It does fun things with the number 5
- Create a new file to work in and import the package
- Use the documentation on npmjs to help you translate “five” into the following languages. You should print
Five in <language> is <answer>:- Dutch
- Japanese
- Binary
Using a Testing Library
Learning Objectives
Last sprint we wrote our first unit tests using the assertion libraries built in to Node. They did the job for us, but they can’t do everything. There will be times when we need to bring in specialised tools to help.
In this section we will look at how we can test our code using a testing framework. We’re going to use Jest, which is one of the most popular JavaScript testing frameworks. We can find out more about Jest from the documentation. We’re going to recreate the tests we wrote last sprint using Jest and see how it compare to using node:test.
Installing Jest
Before we can start using Jest we need a fresh directory to work in.
- Create a new directory called
testing-with-jest. Make you are outside thepackages-practicedirectory. - Copy the
timeConverter.jsfile from the last sprint into this directory. - Create a new file called
timeConverter.test.js - Import
formatAs12HourClock()into the test file
We’re going to install Jest using npm. First we need to use npm init -y to create package.json like before, then we install Jest. There’s going to be a slight difference this time though:
npm init -y
npm install --save-dev jest
This time we have included the --save-dev flag with the install command. Let’s see what that changed in package.json:
{
  // ...
  "devDependencies": {
    "jest": "^30.5.0"
  }
}
This time we have a devDependencies key instead of dependencies. There won’t be a difference in terms of how we use the packages while we are writing code, but the two are handled differently when the time comes to deploy our code. Certain dependencies support core parts of our program, such as checking if a number is odd in the previous example. Others are only useful while we are still developing. Testing falls into the second category: our end users won’t need to run the tests when they have the finished app in front of them. Those dependencies are marked as devDependencies.
Version numbers
Every dependency we install has an associated version number. In this example we have installed version 30.5.0 of Jest. If a new version of a package is released these digits will change and npmjs has anarticle explaining what each digit represents. It’s important to keep a record of which version of a package we have used in development.
That applies to our packages’ dependencies too, which is where the package-lock.json file comes in. This keeps track of the version numbers of every dependency in our tree so we can exactly recreate the structure of our program later, even if something in the middle of the tree receives an update.
Testing with Jest
Learning Objectives
Let’s revisit formatAs12HourClock() and test it using Jest.
Defining a test
We’re going to use Jest’s test() function to define our test. Jest is a little different from other packages in that we don’t need to import the functions to be able to use them.
Every time we use test() we need to pass it two arguments:
- A string describing what we’re testing
- A function where we will call the function we are testing and define the expected outcome
We’ll start by providing the string and an empty function.
import {formatAs12HourClock} from "./timeConverter";

test("correctly convert time after 12:00", () => {
  // TODO
});
Inside the function we are going to use two more functions from Jest:
expect()will be used to call the function we are testing and capture the actual value returnedtoEqual()will be used to provide the expected value
import {formatAs12HourClock} from "./timeConverter";

test("correctly convert time after 12:00", function(){
  expect(formatAs12HourClock("23:00")).toEqual("11:00 pm");
});
When we run our test:
- The value
"23:00"will be passed toformatAs12HourClock - The code in the function will be executed and the returned value will be stored as the actual value by
expect() - The actual value will be compared to the expected value passed to
toEqual() - The test will pass if the two values match. If they don’t it will fail.
Running the test
If we try to run timeConverter.test.js using Node we’ll get an error. That’s because Jest isn’t designed to be run in the same way as a typical program, we’ll need to use npm to help us out.
Take a look at package.json and you’ll see a scripts property with a nested object as its value. We can define scripts which can execute larger processes when we type npm run {scriptName}. We already have a value defined for test:
{
  "scripts": {
    "test": "echo \"Error: no test specified\" && exit 1"
  }
}
Try running it by typing npm test in the terminal and see what happens:
npm test

Error: no test specified
This is a useful default, but now that we have a test we don’t want to see an error message when we try to run it. Replace the string associated with test with the one shown below:
{
  "scripts": {
    "test": "node --experimental-vm-modules ./node_modules/.bin/jest"
  }
}
Remember to also update the type value to "module".
Now try running npm test again. This time the test should run successfully and log the results to the terminal. You should see the string you passed to test() copied there with a check mark beside it to indicate that the test passed. Success!
✍️Exercise: More than just equality
The toEqual() function is an example of a matcher. Using the Jest documentation read about some other matchers which are available and identify which one would be most appropriate to use in each of these tests:
- Checking if a function returns a value above a given minimum
- Adding two decimal numbers
- A function’s return value isn’t
null
Solutions:
toBeGreaterThan()toBeCloseTo()not.toBeNull()
Test-Driven Development
Learning Objectives
So far we have been writing our tests after we have written our functions and using them to confirm that the functions do what they are supposed to do. The tests we write are still valid, but by taking this approach we risk confirmation bias - we write the tests to prove something we already know to be true.
We can avoid this by writing the tests before we write any code. This process is called test-driven development (TDD). We write tests which cover the desired behaviour of our function, then write the code to make those tests pass.
How could TDD have helped last sprint?
Think back to the last sprint and how we built up the test suite for convertTo12HourClock:
- We wrote a test to ensure it worked for an afternoon time (
"23:00") - We wrote a test to ensure it worked for a morning time and discovered a bug (
"08:00") - We realised we forgot an edge case (
"00:00") and had to modify the function again.
After each step we thought we were done, but we weren’t. We’re still not finished now - we haven’t written any tests to validate inputs, or checked early afternoon times. Because we were working in this file a lot while we learned about testing we found each of these issues quickly, but if we were working on a real-world project there could be a long time between “finishing” the code, discovering a missing test and fixing any bugs that arise. That’s a lot of opportunities for something to go wrong.
Instead our workflow could have been:
- Write tests for afternoon time, morning time and the midnight edge case
- Write our first attempt at the function body
- See some tests pass and some fail
- Immediately fix bugs or add missing logic
We know what we need to do before we even start coding and we have the tools in place to identify problems before we declare ourselves finished. It doesn’t guarantee that our code will be perfect, but it means many of the potential problems will be fixed before we declare ourselves “finished”.
Red-Green-Refactor
An important aspect of TDD is the need to verify that our code is what’s making the test pass. That means ensuring that the test isn’t passing by itself without us writing anything. If that happens we may have a poorly-defined test.
Watching the tests fail first is part of the red-green-refactor cycle:
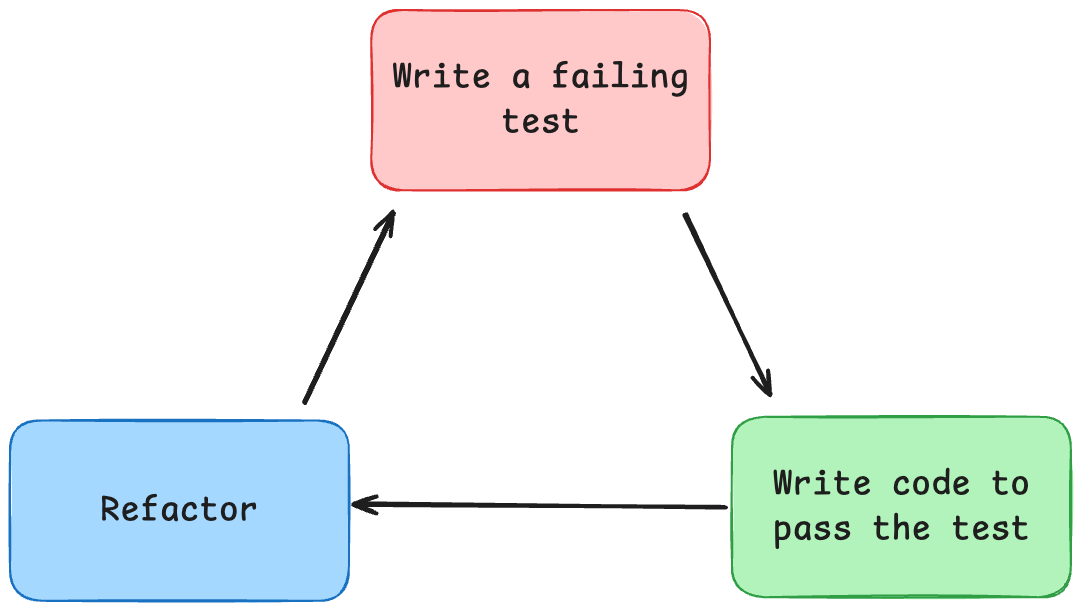
- Write a test
- Run the test file and watch the test fail
- Write enough code to make the test pass - no more than necessary!
- Run the test again and make sure it passes
- Refactor the code if necessary to improve readability or efficiency
- Run the test again to make sure it still passes
- Repeat with the next test
After modifying the function being tested we should always re-run all of the tests, not just those for the feature we are writing. Making a change in one place can easily break something somewhere else.
It can be difficult to get into the TDD mindset, but once we do there are real benefits to it. In the next section we’ll look at an in-depth example of the TDD workflow.