Ordinal numbers
Learning Objectives
🏢 Let’s imagine you’re working in a 10 storey office building. There are 10 different levels. We need a way to describe each level of the building. We start on the ground floor of the building - level with the ground. We use an ordinal number to describe the other levels in the building.
To form the ordinal number we take a number and add the correct
☝🏿 Up from the ground floor, we are then on the 1st floor (first floor) ☝🏽 Up from the 1st floor, we are on the 2nd floor (second floor)
| number | + suffix | = ordinal number |
|---|---|---|
| 1 | st | 1st |
| 2 | nd | 2nd |
What will the ordinal number be for:
a) 21?
b) 40?
c) 49?
d) 13?
Use ordinal numbers to write the days of the month for the following events:
a) Tomorrow b) A week from now c) Easter Sunday 2024 d) When is Eid expected to occur in 2024
- 1st
- 2nd
- 3rd
- 4th
- 5th
- 6th
- 7th
- 8th
- 9th
- 10th
📋 Specification
Let’s consider a function called getOrdinalNumber that needs to work like this:
- it takes one argument - a whole number, like 1, 2, 3, etc
- it returns a string that represents the ordinal number
getOrdinalNumber(1); // returns "1st";
getOrdinalNumber(2); // returns "2nd";
getOrdinalNumber(6); // returns "6th";
The requirements above form a
getOrdinalNumber to behave when it is called with different inputs.
Testing frameworks
Learning Objectives
To help us think about the requirements of getOrdinalNumber, let’s consider one case:
💼 Case 1
const input = 1;
const currentOutput = getOrdinalNumber(input);
const targetOutput = "1st";
Case 1 states that when getOrdinalNumber is called with an input of 1, it has a target output of “1st”. Our first step is to check that getOrdinalNumber works as we have stated.
We have used console.assert to write assertions to write tests for our code before. console.assert is a useful building block, but it is limited. Now we will write tests using a
🔑 A test is any piece of code that runs an assertion on the code we’re testing
We want our tests to:
- be easy to write
- be easy to read
- give clear feedback on what the current output is
- give clear feedback on what the target output is
- allows us to easily write multiple test cases
A test framework will help us build test cases like this.
🧑🏽🧑🏿 Dialogue
We can use a short dialogue to think about why we want to use a testing framework:
- 🧑🏽 Büşra
- Ali, looks like I need to implement a function.
- 🧑🏿 Ali
- Cool. How are you going to check it works?
- 🧑🏽 Büşra
- I’m going to use tests to check that the function gives the target output as described in the specification
- 🧑🏿 Ali
- Seems wise. How are you going to write a lot of tests efficiently?
- 🧑🏽 Büşra
- I’m going to use a testing framework to write test cases quickly. The framework will make sure that the tests give fast, reliable feedback.
Starting a project
Learning Objectives
Let’s start a brand new project in a directory called ordinal-testing-example and create a file called package.json in our project.
- Open your terminal and ensure you’re inside the
CYFdirectory you created earlier in the course. - Make a new directory on your local machine called
ordinal-testing-example. - Change directory into
ordinal-testing-exampleand double-check your current working directory.
% pwd
.../CYF/ordinal-testing-example
💡Package
package.json stores useful information about our project, like the name, description, and version. It is written in the JSON format.- Create a
package.jsoninordinal-testing-example. - Make sure it contains a name and description.
👉🏽 Need help? Follow step by step instructions
- Create a
package.jsonfile in your project directory:
touch package.json- Add a name to it like this:
{
  "name": "ordinal-testing-example"
}- Add a description:
{
  "name": "ordinal-testing-example",
  "description": "An example application showing how to write tests using the jest framework"
}
We can continue adding more information about our project as the project grows. For now, double-check we only have a package.json in our project:
% ls
package.json
Using packages
Learning Objectives
When writing software, we continually make use of software written by other developers. We can call these
We use packages so that we don’t have to solve every problem ourselves. Other people have often solved some things we need to do really well. Using other people’s solutions to parts of a problem means we can focus our time and effort on what’s special about our problem.
Imagine we wanted to work out what the time is in a user’s city. Instead of writing code to work out the time for every city’s time zone (and when they change!), we can use a package some “city time” experts have written, and which they keep up to date.
Different programming languages give developers different ways of accessing packages for use in their code. We will use
npm, downloads and manages useful packages of code from the npm registry.
Interpreting feedback
Learning Objectives
We currently have a project structure like this:
week-4-test-example
├── get-ordinal-number.test.js
├── package.json
├── package-lock.json
└── node_modules

1 directory, 3 files
And get-ordinal-number.test.js
looks like this
test("converts 1 to an ordinal number", function () {
  expect(getOrdinalNumber(1)).toEqual("1st");
});
After running the test above, we should get feedback indicating whether or not the test has passed.
✍️Predict and explain
🚢 Defining the function
At the moment, our test feedback gives the following:
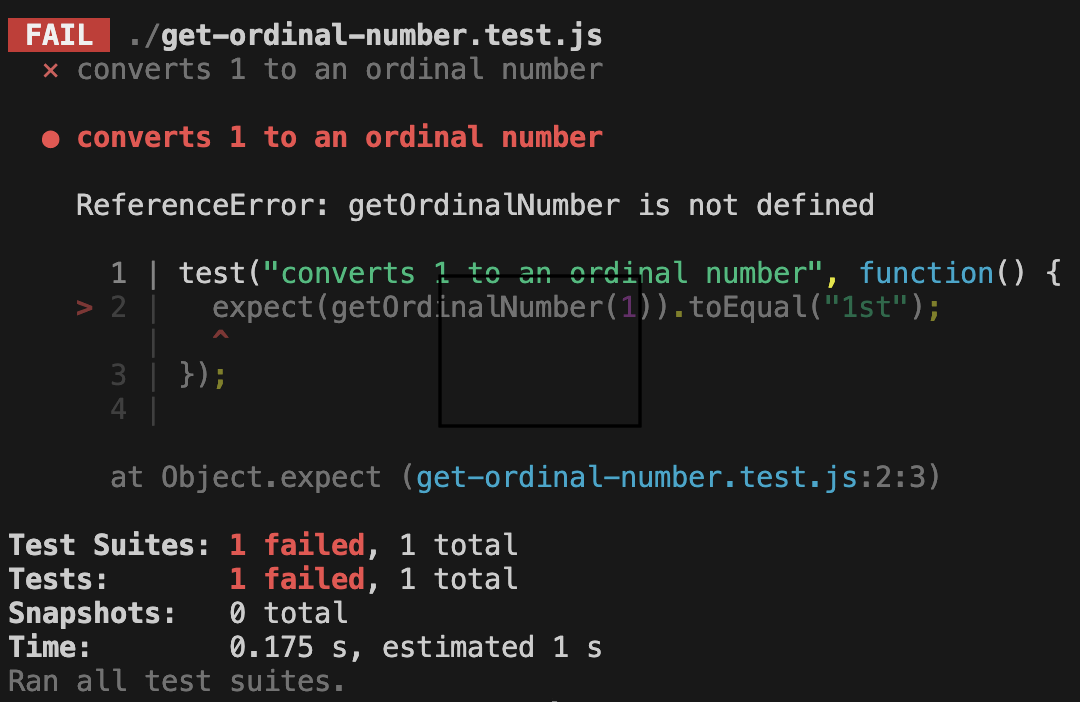
Just like we saw when the test function wasn’t defined, the test code is throwing a
This means that we haven’t defined a function named getOrdinalNumber, but we’re trying to use it.
To fix this, we can declare getOrdinalNumber.
function getOrdinalNumber() {}

test("converts 1 to an ordinal number", function () {
  expect(getOrdinalNumber(1)).toEqual("1st");
});
Now we can run the tests again and check the test feedback.
Assertion errors
We now get the following feedback:
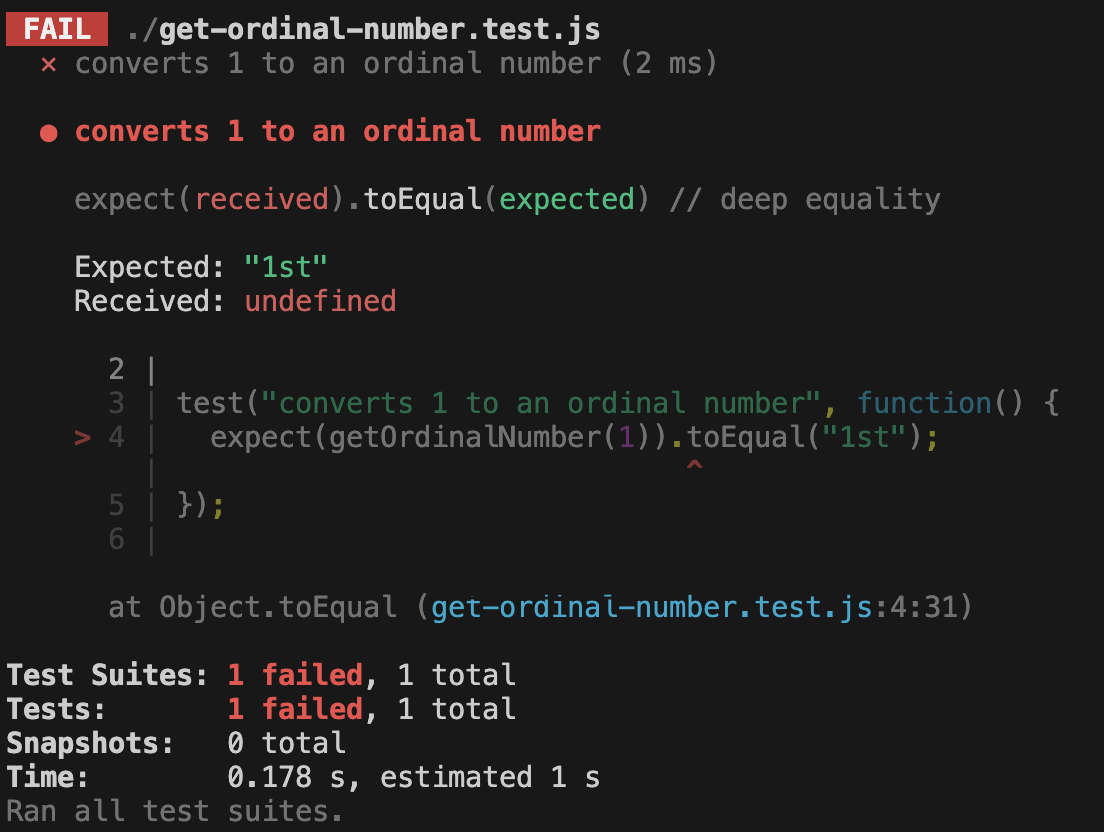
Jest tells us 3 main things:
- The test case that failed
- The target output and the current output
- The line number where error occurred
Jest defines Expected and Received in the test feedback:
- Expected: “1st”
- Received:
undefined
✍️exercise
What are the values of Expected and Received in the test output?
How do Received and Expected match up with the target output and expected output ?
What line number did the test case fail on?
Avoiding repetition
When we wrote console.assert tests before, we ended up extracting variables because we were re-using values.
Without Jest, this assertion would probably have looked more like:
const input = 1;
const targetOutput = "1st";
const currentOutput = getOrdinalNumber(input);
console.assert(
  targetOutput === currentOutput,
  `Expected ${targetOutput} but got ${currentOutput}`
);
Because Jest makes a useful error message for us telling us what the target and current outputs are, we could write this all in one line. We didn’t need a variable so we could pass "1st" both to getOrdinalNumber and into the message.
Jest helped us to avoid writing more repetitive code.
Passing getOrdinalNumber
We can now pass the test by implementing functionality for the first test case. We could write the following:
get-ordinal-number.test.js:
| |
Dead Code
Learning Objectives
As software engineers, we have a responsibility to build code that not only fulfils the required behaviours of the programme but is part of a well-structured and “clean” codebase.
What is meant by “clean”?
Clean code generally means code that is:
Understandable for other programmers. We achieve this through good variable naming, avoiding chaining too many methods in one line, good choice of syntax depending on the data type being used, etc.
Avoids duplication. Not repeating code where it could be a reusable function, making more efficient choices in our conditional logic, using loops where relevant, etc.
Passes all tests (if you have tests in the repository).
And importantly, contains a minimal amount of “moving parts”. Removing any bulk that isn’t contributing to the behaviour we want to achieve. This means watching out for “dead code”.
Keeping to clean code helps us collaborate better, code more efficiently and accurately, and make programmes more readable.
It means products we build can be maintained in the future without wasting more developer time than necessary trying to work out what the code is doing.
What is meant by “dead” code?
A segment of code that is no longer used.
As a programme evolves there might be many changes, fixes, feature additions made to the code. There is a high probability that when those changes were made to the code, there was no time to “clean” up the existing or old code. This can lead to code being left in the repository that no longer has purpose, whether by accident or on purpose.
One common way to identify dead code in our programmes is by using a
When we remove dead code we can reduce the “bloat” of our code, making it easier to maintain and improving debugging processes. It means we don’t need to read and understand code that isn’t used.
✍️Exercise
📖 Read this more detailed breakdown of dead code from Devopedia: https://devopedia.org/dead-code.
❓ Answer the following questions:
- What makes a piece of code count as “dead code”?
- What is the difference between “redundant code” and “unreachable code”?
- Why do we want to remove “dead code” as much as possible? What are the benefits of removing it?
- What tool makes finding “dead code” in our repositories easiest? (Hint: Do you use this tool already to code?)
💡Tip
In the related backlog item, you will look for dead code in an existing code base and handle it appropriately. Have fun!
Generalising further
Learning Objectives
In English, ordinal numbers mostly follow the same pattern.
Numbers ending in 1 will generally have an ordinal number ending in “st”.
Here are some examples of this pattern,
1st, 11th, 21st, 31st, 41st,…
All the numbers ending in 1 will continue to end in "st", with the exception of 11.
11 is slightly different and ends with a "th".
We can now update our test case to check that getOrdinalNumber works for lots of different numbers ending in 1.
get-ordinal-number.test.js:
| |
We’ve also updated the test description because we’re adding more assertions and checking slightly different functionality.
✍️🔧 Implement
getOrdinalNumber so it passes the test case above.Anonymous functions
Learning Objectives
We have seen functions written like this:
function convertToPercentage(decimalNumber) {
  return `${decimalNumber * 100}%`;
}
In our tests we wrote the functions differently:
function(){
  assert.equal(formatAs12HourClock("23:00"), "11:00 pm");
}
Note the difference between the two: we didn’t give a name to the function in our test.
This is ok, because we don’t need it to have a name. We don’t call the function by name. We passed the function as an argument to the test function. When we execute the code Node will create its own label internally and use that when it needs to reference the function.
We can imagine the test function is defined like this:
function test(label, testFunction) {
  // Call the passed test function
  testFunction();
}
The internal label attached to the function by Node doesn’t matter because the function will only ever be called by Node. We will never need to use it again outside of this test.
Otherwise, these two functions act the same. The only difference between them is whether we created a variable name for the function in the scope where we defined it.
Arrow functions
Learning Objectives
As we progress through this course we will find lots of situations where we can use anonymous functions. In this section we’ll see how we can make them even shorter by removing the function keyword and in some cases reducing everything to a single line.
Types of functions
We have already seen lots of examples of named functions. These are functions defined like we did in the previous module.
function convertToPercentage(decimalNumber) {
  return `${decimalNumber * 100}%`;
}
In the last section we introduced the concept of anonymous functions where we don’t need to assign a name to the function.
function (decimalNumber) {
  return `${decimalNumber * 100}%`;
}
The function keyword isn’t the only way for us to define a function. In modern versions of JavaScript we can leave it out, but we still need a way of linking the list of parameters to the function body. We use an arrow symbol (=>) to do so and this is why we call anonymous functions defined this way arrow functions.
(decimalNumber) => {
  return `${decimalNumber * 100}%`;
};
When using arrow functions we can go a step further and omit the braces and return keyword too. This is called an implicit return but it can only be used when the function body contains a single expression.
(decimalNumber) => `${decimalNumber * 100}%`;This can make it easier and quicker to write functions. It also reduces the number of things we need to read in a function.
✍️Exercise: Using arrow functions
Rewrite your tests in timeConverter.test.js to use arrow functions.
Solution:
test("correctly convert time after 12:00", () => assert.equal(formatAs12HourClock("23:00"), "11:00 pm"));

test("can correctly convert morning time", () => assert.equal(formatAs12HourClock("08:00"),"08:00 am"));

test("can correctly convert midnight", () => assert.equal(formatAs12HourClock("00:00"),"12:00 am"));
We can use the implicit return syntax here because the assert.equal() call is the only expression in the function body.
Assigning functions to a variable
Our anonymous functions don’t need to stay anonymous - we can assign them to a variable if we need to. When we want to call the function we can do so using the variable name, just like we would if it was a named function.
Create a new file to try this in.
const doubleNumber = function(number){
    return number *2;
}

const halfNumber = (number) => number / 2;

console.log("doubled number:", doubleNumber(2));
console.log("halved number:", halfNumber(2));
Running the file prints:
doubled number: 4
halved number: 1
Testing Workshop
Learning Objectives
To get the most out of this workshop - don’t just watch, code along 💻 You can use the code samples below as a starting point.
Exercise 1
// Create a function that takes three numbers as parameters
//   and returns the largest of the three
Exercise 2
- Start with an empty folder
- Create a new NodeJS project:
npm init -y - Install Jest as a dependency:
npm i jest --save-dev - In package.json, change
"test": "echo \"Error: no test specified\" && exit 1"to"test": "jest" - Create a file for our first exercise:
example1.test.js - You can run your tests using
npm test